Overview
Relay turns Excel into your bulk-editing surface for Revit schedules. You export one or more schedules to neatly formatted .xlsx files, edit the values comfortably in Excel (sort, filter, copy and paste, fill series) and then bring the changes back into the model. Nothing is written to Revit without first passing through a preview where you see every change cell by cell and decide which ones to apply.
The tool keeps track of the state of each schedule: it knows whether the Excel file is up to date, whether you have edited it, whether the Revit model has changed since the export, or whether both have happened at once. That state is shown as a coloured pill on each row and is the compass for the whole workflow: it tells you at any moment what needs doing with each schedule.
Relay runs a three-way comparison: as well as the Excel file and the current model, it stores a hidden copy of the values at the moment of export inside the file itself. That way it can tell precisely what you edited in Excel apart from what has changed in Revit since then, and it warns you when the two come into conflict.
Who it's for
Architects, BIM managers and coordinators who need to fill in or correct parameters in bulk (marks, comments, finishes, joinery data, sheet lists...) without going element by element in Revit, and teams where part of the data work is done in Excel by people who do not use Revit.
Requirements
- Revit 2022, 2023, 2024, 2025 or 2026 with the BIMIO suite installed (Relay loads with the BIMIO tab).
- An open project with at least one schedule.
- Write permissions on the chosen export folder.
- Microsoft Excel (or any .xlsx-compatible application) to edit the exported files. Excel does not need to be installed to export and sync: Relay reads and writes the .xlsx files directly.
- The Excel file must be closed during export and sync; if it is open, Relay detects it and asks you to close it.
Where to find it
The BIMIO · Relay window opens; it is not modal, so you can keep working in Revit while it is open.
If the window is already open, clicking the ribbon button brings it to the front instead of opening another copy.
On opening, the window automatically loads every schedule in the active project.
Key concepts 8 terms
- Sync state (Status pill)
- A coloured label on each row that summarises the relationship between the Revit schedule and its Excel file: Ready (never exported), Up to date (everything current), Revit changed (the model changed after export; the Excel file is stale), Excel pending (you have edited the Excel file and there are changes to sync), Conflict (both sides have changed), File missing (the exported Excel file no longer exists on disk) and Unsupported (the schedule does not support the round trip).
- Layout: Preserve / Itemise
- How the Excel rows are generated. Preserve respects the schedule's own configuration: if it is not itemised per instance, one Excel row can represent a group of several elements (useful for editing type parameters in bulk). Itemise forces one row per element, so each Excel row corresponds exactly to one element in the model.
- Grey cells (read-only)
- In the exported Excel file, cells with a grey background correspond to parameters Revit does not allow you to edit (calculated, derived or locked). Any change you make in them is ignored when syncing. The headers also carry clarifying suffixes: (Type) for type parameters, (Calc) for calculated ones and (ro) for read-only.
- <varies>
- A sentinel value that appears when a row groups several elements that do not share that value. If you leave it as it is, nothing happens on sync. If you replace it with a real value, Relay will ask you for confirmation case by case before applying that value to every element in the group, telling you how many are affected.
- Hidden column A and hidden sheets
- The exported Excel file includes a hidden column A with the internal keys of each row (unique element identifiers) and several hidden sheets: _FJV_Meta (the identity of the project and the schedule) and a copy of the exported values that serves as the baseline for comparison. Do not modify or delete them: they are what allows Relay to recognise the file and match each row to its element.
- Three-way comparison
- When syncing, Relay compares the current Revit value, the Excel value and the value at the time of export (the hidden baseline). That way, a change made in Revit by a colleague shows up as Revit changed rather than as an Excel edit of yours, and when both sides differ from the baseline the cell is flagged as a conflict for you to decide.
- Type parameters and propagation (LINKED tag)
- A type parameter is shared by every instance of the same type. If you edit it on a single Excel row, Relay propagates the change to the sibling rows of the same type and marks them with a LINKED tag in the preview: ticking or unticking one ticks or unticks them all together. If two rows of the same type propose contradictory values, it is treated as a validation error and is not applied.
- Fingerprint
- A digest of the schedule's content that Relay stores on export. By comparing it with the current fingerprint it detects whether Revit has changed since then; together with the Excel file's date and size, it is what drives the status pill.
The interface
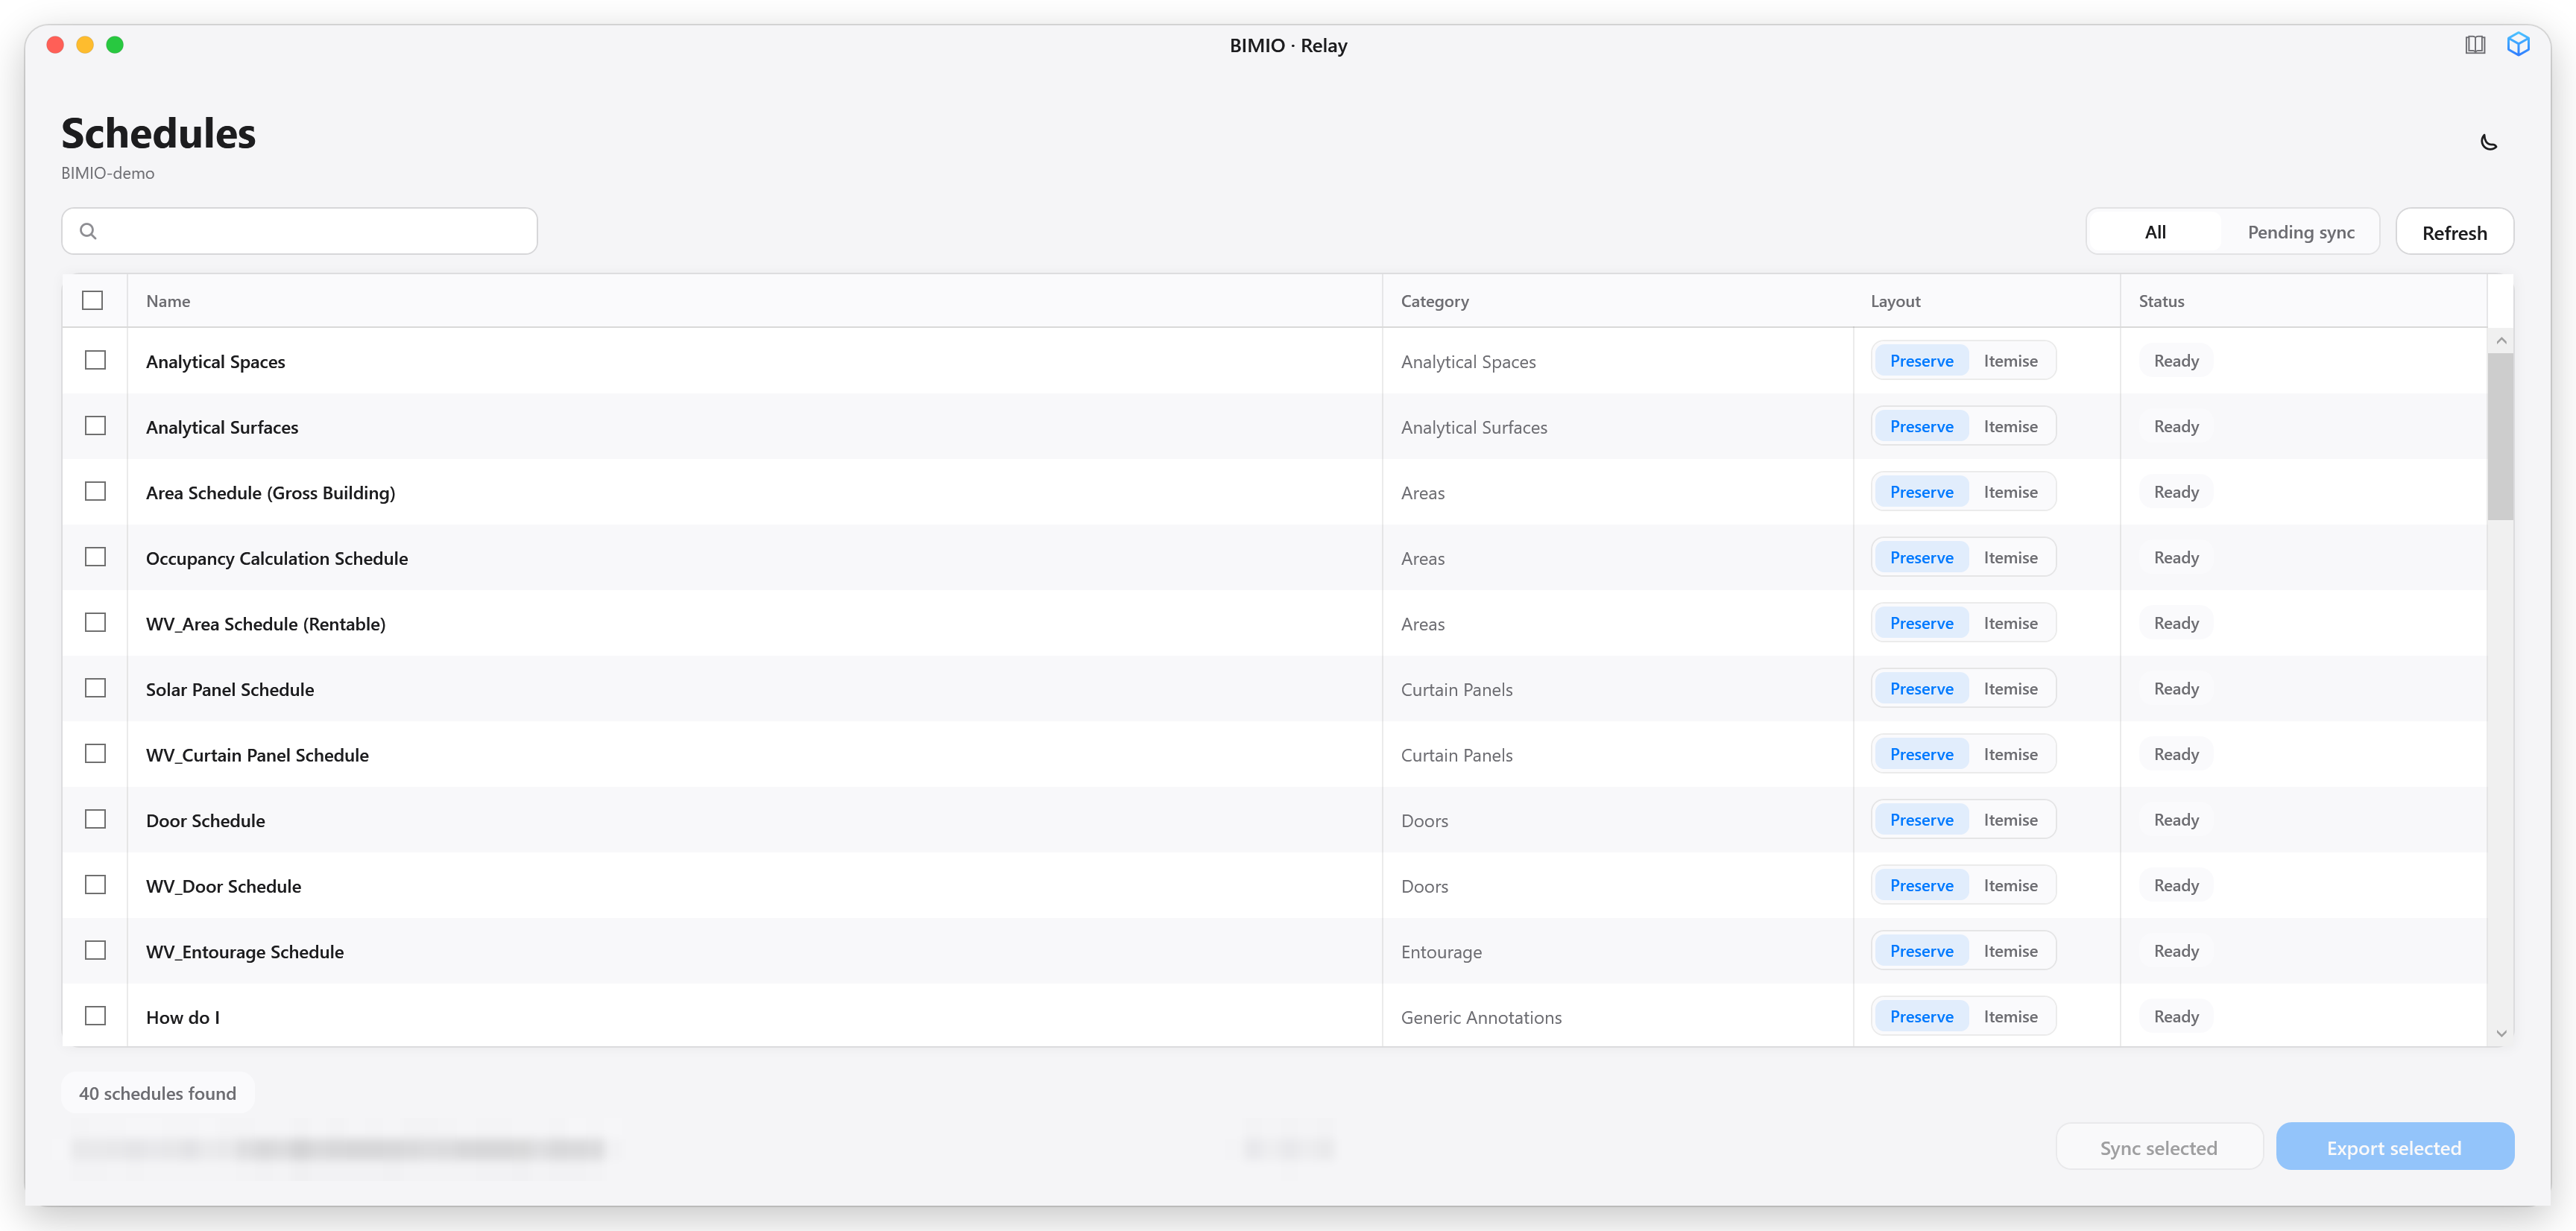
The main window, titled BIMIO · Relay, is a single panel listing every schedule in the project. At the top you have the Schedules title with the project name and a button to toggle the light/dark theme; below that, a bar with the search box, the All / Pending sync filter and the Refresh button; in the centre, the schedules table; and at the bottom, the overall status pill, the export folder chip and the two action buttons: Sync selected and Export selected.
During long operations (loading, exporting, syncing) a centred progress popup appears with the percentage, a counter (for example, 3 of 12) next to the name of the schedule in progress and a Cancel button to abort the operation.
Step-by-step workflows 9 workflows
1Open Relay and find your way around the list
6 steps
Goal. Load the project's schedules and understand the state of each one.
- Open the BIMIO tab on the Revit ribbon and, on the Data panel, click Relay.The BIMIO · Relay window opens and starts loading automatically; a progress popup shows Loading schedules and then the schedule-by-schedule status check. You can abort it with Cancel if the project has a huge number of schedules.
 assets/shots/relay/fig-03.pngThe main Relay window just opened with the Loading schedules progress popup in the foreground.
 - Look through the list: each row shows the schedule's name, category, layout and status pill.Supported schedules appear first. Unsupported ones show the reason under their name (for example, material takeoff schedules or those containing elements from linked models) and have their checkbox disabled.
- Type in the search box to filter by name or category.The filter applies instantly, with nothing else to press.
- Click Pending sync if you only want to see the schedules that need your attention; switch back to All to see everything.Pending sync keeps the Excel pending, Revit changed, Conflict and File missing states visible. The filter is not saved: every session starts on All.
- Double-click a row to open that schedule inside Revit.The Relay window minimises to let you see the schedule; restore it from the taskbar when you are done.
- Click Refresh whenever you create or modify schedules in Revit to re-scan the project.
- Hover over the status pill to see a tooltip with when and where it was last exported.
- The window does not block Revit: you can leave it open while you model.
2Export schedules to Excel
5 steps
Goal. Generate an editable .xlsx file for each selected schedule.
- Check the destination folder on the Export folder chip in the window footer; to change it, click the chip, type or browse to the folder and confirm with Use this folder.By default an FJV.ScheduleSync.Exports folder on the Desktop is used. The choice is saved per project (and as the global default for new projects).
- Choose the layout for each schedule in the Layout column: Preserve or Itemise.Preserve respects the schedule's grouping (one row can represent several elements); Itemise forces one row per element. Decide before exporting: changing it later forces a re-export.
- Tick the checkbox of the schedules you want to export.The header checkbox ticks or unticks every row visible under the current filter. You can also highlight several rows with Ctrl or Shift and tick one checkbox: the change propagates to all highlighted rows.
- Click Export selected.If any selected schedule has unsynced Excel edits (Excel pending or Conflict), Relay warns you that re-exporting would wipe them: Yes, overwrite includes them anyway and Cancel excludes them from the batch and exports only the rest.
 assets/shots/relay/fig-04.pngThe Exporting schedules progress popup showing 2 of 5 and the name of the schedule in progress.
 - When it finishes, review the Export complete dialog and click Open file to open the last file, or OK to close.You can tick Don't show this for the rest of this Revit session to stop seeing this notice for the current session. The exported schedules move to the Up to date state.
 assets/shots/relay/fig-05.pngThe Export complete dialog with the name and path of the generated file and the Open file and OK buttons.
- The footer status also works as a shortcut: after a successful export, clicking the green pill opens the last exported file.
- Saving is atomic: if something fails mid-write, the previous file is not corrupted.
3Edit the Excel file without breaking the sync
6 steps
Goal. Modify values in Excel in a way Relay can read and apply later.
- Open the exported file in Excel and edit the values in the white cells.You can copy and paste, fill series, sort and use the autofilter as normal: the filter includes the hidden key column, so sorting does not knock the rows out of sync.
 assets/shots/relay/fig-06.pngAn Excel file exported by Relay: a title row with the schedule name, tinted headers, grey read-only cells and one cell with the text <varies> in italics.
 - Respect the grey cells: they are read-only and any change in them will be ignored.The third row of the file includes a legend reminding anyone who receives the file without knowing the tool of these rules.
- Leave the <varies> text as it is unless you want to impose the same value on the whole group of elements in that row.If you replace it with a real value, Relay will ask you for explicit confirmation when syncing, telling you how many elements are affected.
- In Yes/No columns, choose the value from the cell's dropdown rather than typing it.
- Do not touch the hidden column A or the hidden sheets (_FJV_Meta and the baseline); do not change the column headers.You can delete whole rows or columns to focus on a subset: Relay reads that as a filter of yours, not as changes to apply.
- Save the file and close it before returning to Relay.While the file is open in Excel, Relay cannot read or write it and will show you the Close Excel to continue notice.
- The file can travel by email or through the cloud and come back: as long as the hidden sheets and column A remain intact, Relay will accept it.
- If you add an auxiliary column with your own notes, no harm done: columns that do not exist in Revit are ignored.
4Sync the Excel changes back to Revit
6 steps
Goal. Apply what you edited in Excel to the model, with a prior review.
- In Relay, click Refresh if the schedule does not yet show Excel pending.
- Click the Excel pending pill on that row, or tick several schedules and click Sync selected to process them one by one.With several rows highlighted (Ctrl/Shift), clicking the pill on one launches the action for every highlighted row that shares the same state.
- Review the Review changes window: each modified cell shows old value → new value with a checkbox to include or exclude it.If the diff contains problems (for example, contradictory edits of the same type parameter), the Some changes can't be applied notice appears first: those cells are excluded automatically and the rest remains applicable.
 assets/shots/relay/fig-07.pngThe Review changes window with the changes table: cells with ticked checkboxes, a LINKED tag on a type parameter and the Apply 12 changes button at the bottom right.
 - Tick or untick the cells you want to apply and click Apply N changes.The button shows how many changes are selected and is disabled when there are none.
- If you replaced any <varies>, answer the Overwrite <varies> cells? dialog: review each case and click Yes or Skip, or use Yes to all / Skip all remaining to resolve the whole queue at once.The dialog shows the column, the new value and how many elements each decision affects. Decisions only apply to this sync; the next one asks again.
 assets/shots/relay/fig-08.pngThe Overwrite <varies> cells? dialog showing the notice of how many elements are affected and the Yes, Skip, Yes to all and Skip all remaining buttons.
 - Wait for the changes to finish applying and read the Sync complete dialog; then save the Revit model.All changes are written in a single Revit transaction named BIMIO Relay — Import (a single Ctrl+Z undoes it in full). If Revit rolls the transaction back, nothing is applied and the state tells you so. Relay does not save the model for you.
- If there are partial failures after applying, the schedule stays in Conflict and the footer status offers the log with the details; sync again to retry the remaining cells.
- If the diff turns out to be empty (for example, you only saved the Excel file without changing anything), Relay detects it, does not show you an empty preview and returns the schedule to Up to date.
5Get the most out of the Review changes window
7 steps
Goal. Review the changes with good judgement before applying them.
- Read the summary line: affected cells, edited rows, new rows and deleted rows.
- Toggle between Show changes (only columns with changes, the default) and Show all columns to see the whole table with context.
- Use Select all and Select none to start from everything ticked or everything unticked, then fine-tune cell by cell.You can click directly on the cell's text or on its checkbox to toggle it.
- Watch for the LINKED tag: it marks type-parameter changes propagated from another row of the same type; they toggle on and off as a group.
- Highlight several rows with click, Ctrl+click or Shift+click; toggling a checkbox within the highlighted group propagates the change to the same column of every highlighted row.
- Double-click a row to select its elements in Revit and check them in the model.The preview and the panel minimise together and keep their state; when you restore the panel from the taskbar, the preview comes back exactly as it was.
- Read the row colours: green with a + are rows new in Revit (they will be added to the Excel file on the next re-export) and red struck-through with an × are rows whose element no longer exists in Revit (they will disappear from the Excel file when re-exporting). They are informative: they apply nothing to the model.
 assets/shots/relay/fig-09.pngThe preview with a green row marked with + and a red struck-through row with ×, alongside normal edit rows.
- You can sort by any column by clicking its header and resize columns by dragging their edge.
- Read-only and unmappable cells show a disabled checkbox: they cannot be applied.
- Enter is equivalent to clicking Apply N changes and Esc to Cancel; in Relay's other dialogs, Enter accepts the primary action and Esc cancels.
6Refresh a stale Excel file (Revit changed state)
3 steps
Goal. Regenerate the Excel file when the model has changed since the last export.
- Click the Revit changed pill on the row (or include the schedule in a selection and click Sync selected).If you select several schedules in Revit changed, Relay groups the confirmation into a single dialog for the whole batch.
- In the Overwrite Excel? dialog, click Show changes if you first want to see, in read-only mode, how Revit and the current Excel file differ.This preview is informative: the apply button appears disabled as Read-only preview. With several schedules in the batch, it shows the changes of the first one. Closing it returns you to the confirmation dialog.
 assets/shots/relay/fig-10.pngThe Overwrite Excel? dialog with the list of affected schedules and the Show changes, Cancel and Yes, overwrite buttons.
 - Click Yes, overwrite to re-export and replace the Excel file, or Cancel to leave it as it is.
- If the Excel file also had unsynced edits of yours (Conflict state), sync first from the normal preview so you do not lose them: re-exporting overwrites the whole file.
7Change a schedule's Preserve / Itemise layout
3 steps
Goal. Switch between grouped rows and one row per element.
- In the row's Layout column, click the option you want: Preserve or Itemise.If the schedule has never been exported, the change is saved with no further questions.
- If the schedule already has an exported Excel file, confirm the Re-export to apply the new layout? dialog by clicking Re-export now, or keep the current layout with Keep current layout.The new layout changes the file's row structure, so it has to be regenerated for Excel and Revit to keep matching.
- To change several schedules at once, highlight them with Ctrl or Shift and click the layout on one of them: it propagates to all highlighted rows.
- Use Preserve when you want to edit type parameters in bulk: one grouped row pushes the value to every element in the group.
- Use Itemise when you need to edit different values per element (marks, instance comments...).
8Export the change preview to HTML
3 steps
Goal. Generate a shareable report of the detected changes before applying them.
- With the Review changes window open, click Export to HTML…
- Choose the file's name and location in the save dialog and confirm.The suggested name is the schedule name followed by _preview.html.
- Review the report, which opens automatically in the browser.The HTML reflects the columns visible at that moment (depending on whether you have Show changes or Show all columns active).
 assets/shots/relay/fig-11.pngThe preview HTML report open in the browser, with the schedule name as the title and the list of changes.
- Export the HTML before applying if you need a record of what was changed and from which values.
9Diagnose errors and locked files
3 steps
Goal. Understand what went wrong and unblock the situation.
- If the Close Excel to continue dialog appears, close the file in Excel and repeat the operation.Relay detects the file lock both when exporting and when reading the file to sync.
- If the footer status pill turns red, click it to open the error log.A dialog opens with the details of each error and the Open log folder button to open the logs folder. The log also records notes from successful syncs: skipped blank cells and Revit warnings.
 assets/shots/relay/fig-12.pngThe error log dialog with the summary at the top, the list of messages and the Open log folder button.
 - To abort a long operation, click Cancel in the progress popup.Loading, batch exporting and syncing can all be cancelled between one item and the next.
- Logs are stored in the AppData\Roaming\FJV\ScheduleSync\Logs folder, named sync-date-time.log.
- A partial failure hides nothing: unapplied cells stay marked as pending until they are genuinely applied.
Options reference 8 options
| Option | What it does |
|---|---|
| Export folder (footer chip) | The folder where the .xlsx files are saved. It is remembered per project (it travels with the model) and also as the global default for projects that have not yet chosen one. Default: an FJV.ScheduleSync.Exports folder on the Desktop. |
| Per-schedule layout (Preserve / Itemise) | An individual preference for each schedule, persisted across sessions. Changing it with an Excel file already exported triggers a confirmed re-export. |
| All / Pending sync filter | A toggle on the top bar that limits the list to schedules with pending actions. It is not saved: every session starts on All. |
| Search box | Filters the list by schedule name or category in real time. |
| Show changes / Show all columns (in Review changes) | Toggles between seeing only the columns with changes (the default) or every column in the table. It only affects that preview. |
| Don't show this for the rest of this Revit session | A checkbox available in the Export complete and Sync complete dialogs to silence them for the current session. They come back after restarting Revit or reopening the Relay window. |
| Light / dark theme | The moon/sun button in the window header; it switches the theme of the whole BIMIO interface. |
| Allow renaming families and types from Excel (advanced) | Disabled by default: editing a family or type name cell in Excel renames nothing, because a rename propagates across the whole project (view filters, other schedules...). An administrator can enable it by adding the line apply.allow_family_type_renames=true to the AppData\Roaming\FJV\ScheduleSync\settings.txt file. There is no control in the interface. |
What you get out
- One .xlsx file per exported schedule, named ProjectName_ScheduleName.xlsx, with the visible Schedule sheet (title, editing legend, tinted headers, grey read-only cells, Yes/No dropdowns) and hidden service sheets: _FJV_Meta (identity), the value baseline for the three-way comparison and, where needed, _FJV_LongUids.
- HTML reports of the change preview (the Export to HTML button in the Review changes window).
- Error and warning logs in AppData\Roaming\FJV\ScheduleSync\Logs (sync-date-time.log files) and a daily add-in activity log.
- Internal state files: one JSON per project in AppData\Roaming\FJV\ScheduleSync\projects (it remembers what was exported, when and with which fingerprint) and settings.txt with the preferences.