Overview
Graft is the granular version of Revit's classic Transfer Project Standards. Instead of bringing in whole categories blindly, it shows you in two columns what exists in the source model and what already exists in your current model, and lets you choose exactly which view templates, filters, materials, wall types or line styles you want to graft.
Before transferring anything, Graft compares each standard in the source with its namesake in the destination and labels it with a coloured dot: green if it is new, orange if it exists but differs, grey if it is identical. So you decide based on data, not from memory: you can see field by field what changes before overwriting.
The transfer is safe by design: everything happens in a single transaction (one Ctrl+Z reverts it entirely), view templates automatically bring along the filters they depend on, and types that already have instances placed in the model are never deleted by accident.
Who it's for
BIM managers and architects who maintain office templates and need to align projects with corporate standards, or rescue specific standards from another project without importing extra noise.
Requirements
- Revit 2022 to 2026 with the BIMIO suite installed.
- An open, active project (the destination model). If no project is open, the button shows the Open a project notice.
- An available source model: another project open in the same Revit session or a Revit link loaded in the active model.
- Family files (.rfa) do not work as a source; Graft works project to project.
Where to find it
The window is modeless: you can keep working in Revit with Graft open. If you press the button again, the already-open window is focused instead of creating another one.
The window title is BIMIO · Graft — transfer standards, your way.
Key concepts 7 terms
- Source
- The model the standards are read from. It can be another project open in the session (shown as Open · name, with a local or cloud suffix) or a link loaded in the active model (shown as Link · name).
- Destination
- Always the model active in Revit at the moment the standards are loaded. Graft pins that identity: if you switch the active document after loading, it refuses to graft until you reload.
- new / differs / identical status
- Classification of each standard in the source relative to the destination, matched by name within the same category. Green (new): it does not exist in the destination. Orange (differs): it exists but at least one shared parameter differs, or Graft cannot be sure. Grey (identical): it exists and all comparable parameters match.
- Graft
- Copy the selected standards from the source to the destination in a single Revit transaction named BIMIO Graft — transfer standards. A single undo reverts the whole operation.
- Filter dependencies
- When you select a view template, Graft detects the filters that template applies and automatically adds them to the transfer, even if you have not ticked them, so the template arrives complete.
- Protected
- A destination type you were going to overwrite but which has instances placed in the model. Deleting it would drag those instances with it, so Graft leaves it intact and counts it as protected in the summary.
- Copy order
- Graft copies the graphic primitives first (materials, line patterns, fill patterns, line styles and filters), then the remaining categories and finally the view templates, so that each element finds its dependencies already in the destination.
The interface
The window is organised into two mirrored columns: on the left SOURCE (the source model, with checkboxes to choose from) and on the right DESTINATION · CURRENT MODEL (what you already have, read-only). Both columns show the same categories in collapsible accordion-style sections, and their vertical scrolling is proportionally synchronised so you can compare at a glance.
Above the columns sit the source selector with its Reload button, the colour legend (new, differs, identical) and the quick-selection buttons. At the bottom, the main Graft N selected → button launches the transfer and shows live how many items you have ticked.
Step-by-step workflows 8 workflows
1Open Graft and choose the source model
5 steps
Goal. Prepare the session: load the standards from a source and see them compared against your current model.
- Open the destination project in Revit (the one that will receive the standards) and make sure it is the active document.
- Have the source available: open the template project in the same Revit session, or load that model as a link in your project.Graft lists as sources the other open projects and the links loaded in the active model.
- Go to the BIMIO tab, Setup panel, and click Graft.A modeless window opens. Graft scans the available sources, picks the first one automatically and loads its standards without you having to do anything else.
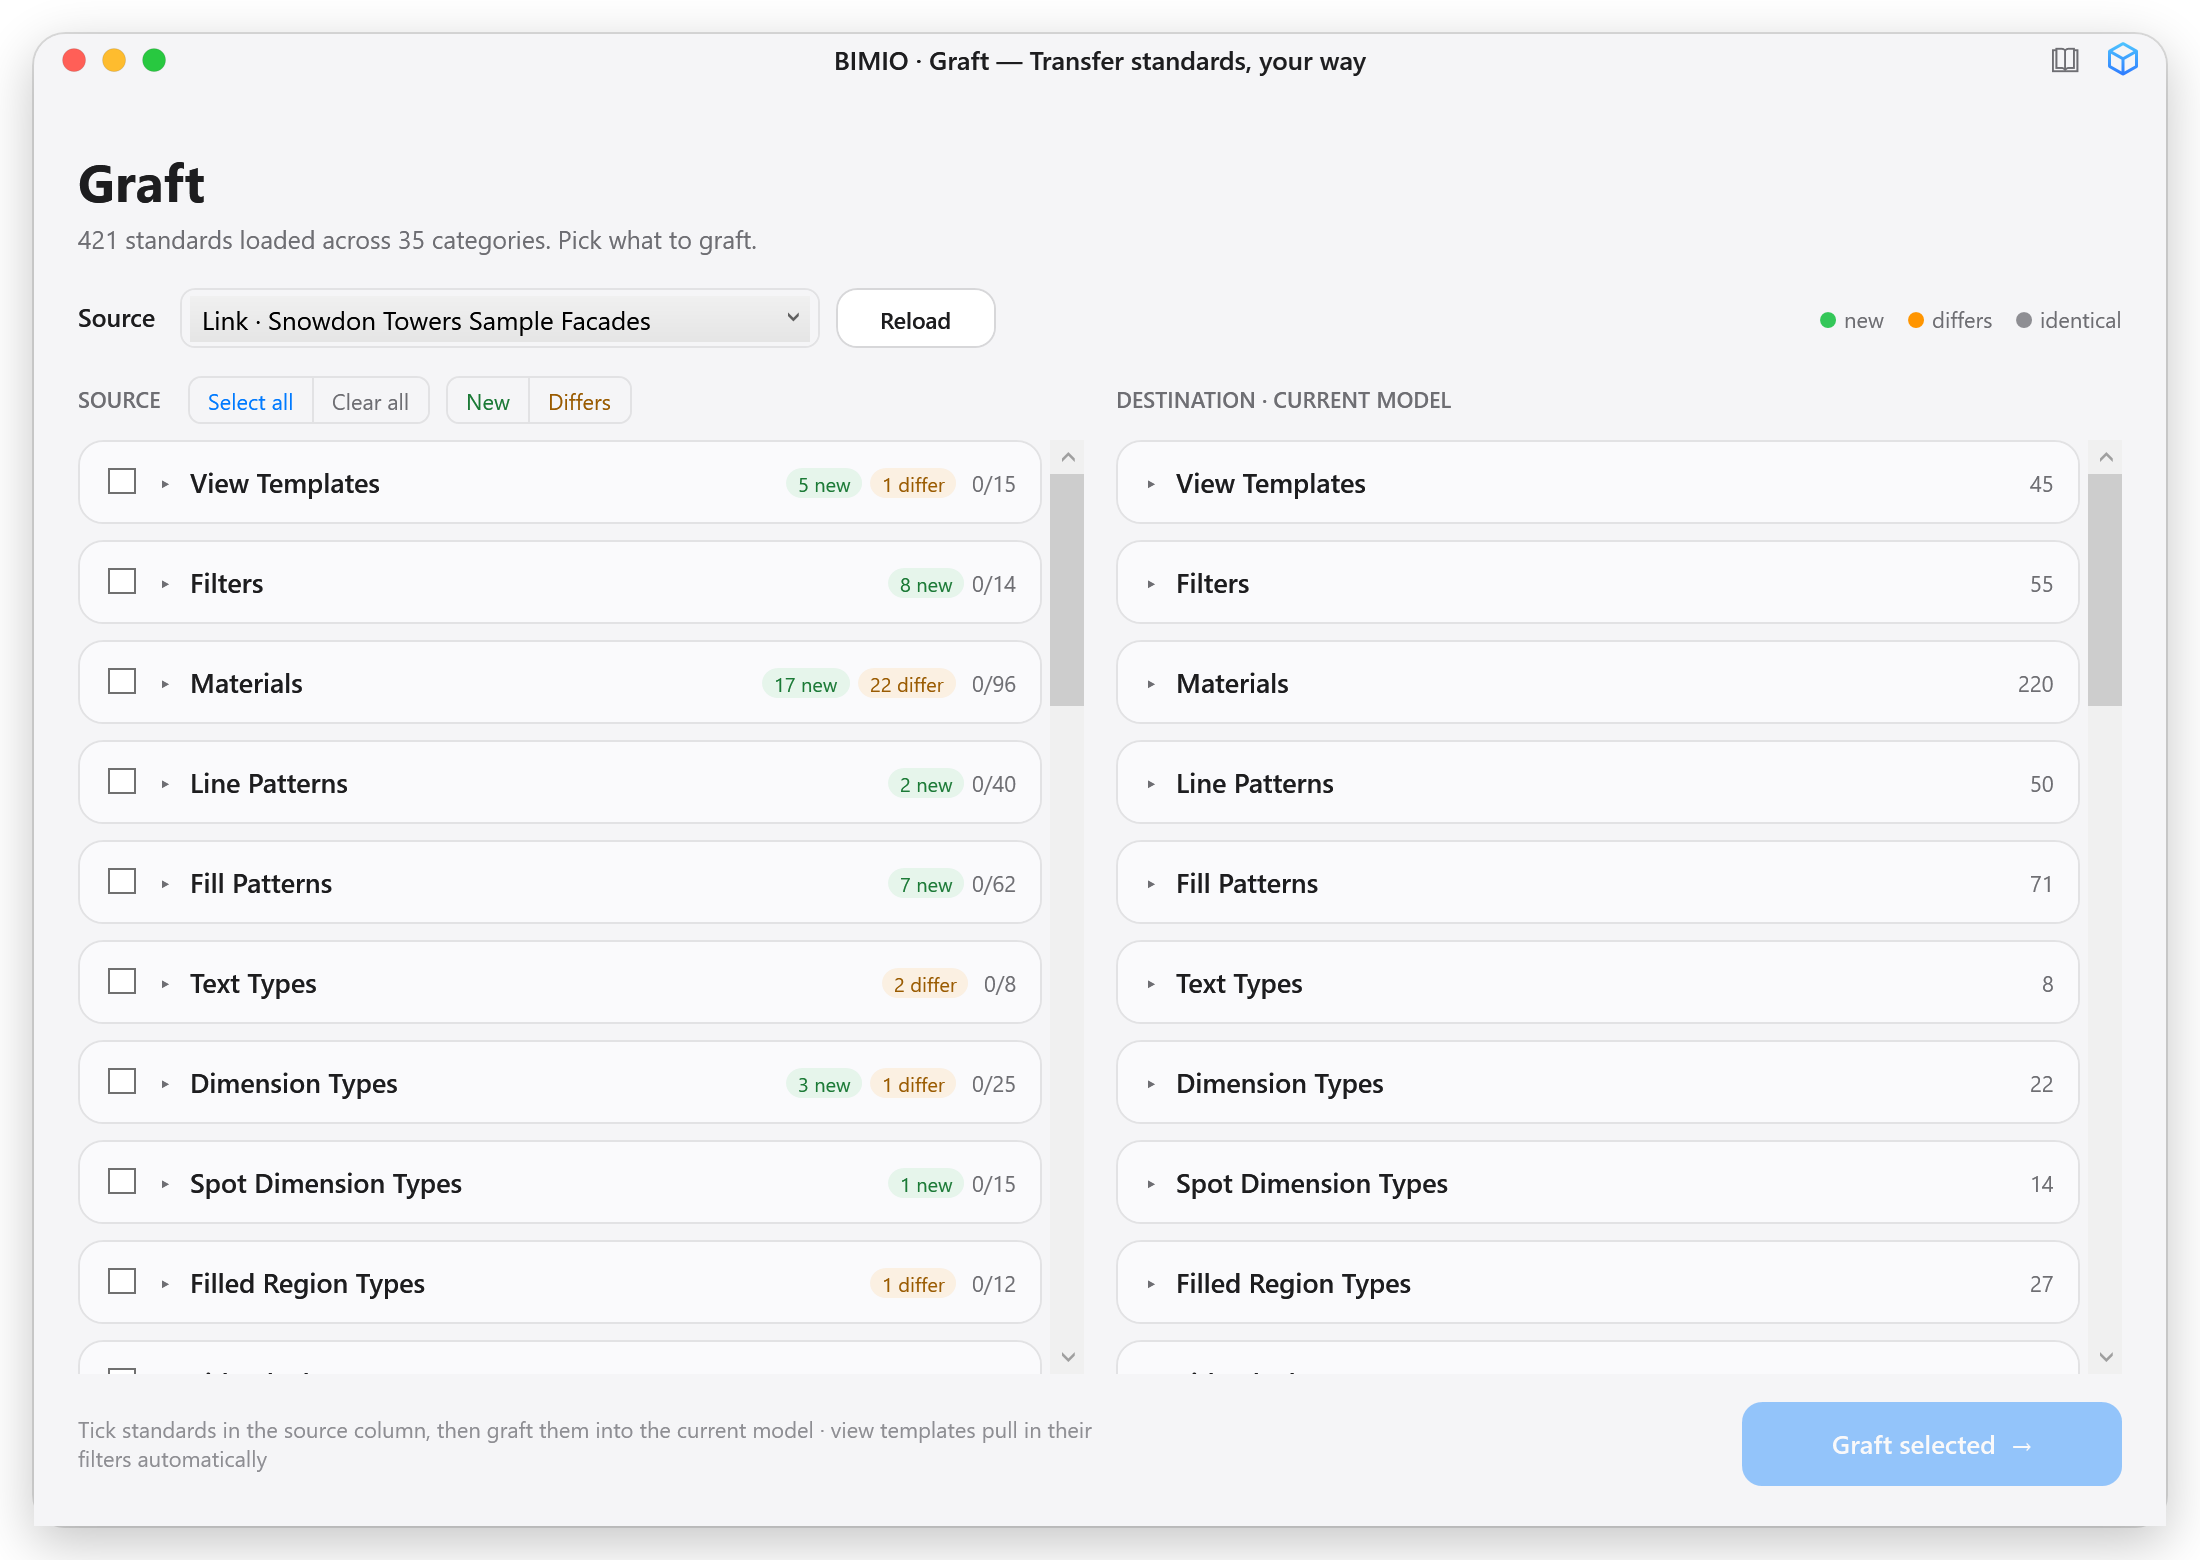
 assets/shots/graft/fig-03.pngFreshly opened Graft window with the status line showing how many standards have been loaded and across how many categories.
 - If the chosen source is not the one you want, open the Source drop-down and select another.When you change the source, the standards reload automatically. Open projects appear as Open · name and links as Link · name.
- Check the status line below the title: it should say how many standards have been loaded and ask you to choose what to graft.If it says no source is available, open the source model or load it as a link and click Reload.
- Working with the source open in the same session is usually more convenient than using a link, but both work the same way.
- The drop-down indicates whether an open project is local or in the cloud (local or cloud suffix).
2Explore and compare the standards in a category
4 steps
Goal. See what is in the source, what is new and what differs, before deciding anything.
- Click a category header (for example View Templates) to expand it.The arrow on the header indicates whether it is collapsed or expanded. The same category can also be expanded in the destination column.
- Look at the chips on the header: the green one shows how many items are new and the orange one how many differ; next to them the selected/total counter is displayed.
 assets/shots/graft/fig-04.pngHeader of the Filters section with the chips 8 new and 3 differ and the counter 0/24.
 - Type in the section's search box to filter by name.Each section has its own search box, in both the source and destination columns. The cross that appears on the right clears the text.
- Scroll through the list and compare against the right-hand column: both scroll in proportional sync.
- Sections with no items are not shown, so the list only displays categories with real content.
- The search box does not clear your selection: ticked items stay ticked even when hidden by the filter, but bulk actions only affect visible items.
3See exactly what differs in a standard (compare)
4 steps
Goal. Before overwriting, know field by field how the standard in the source differs from the one you already have.
- Find an item with an orange dot (differs) in the source column.
- Click the orange compare chip on that row, or double-click the row.The chip only appears on items that differ; on new or identical items there is nothing to compare.
- Review the What differs dialog: three columns with the field, the value in the source and the value in the destination.For filters it adds the number of categories they apply to, and for view templates the number of applied filters and hidden categories.
 assets/shots/graft/fig-05.pngWhat differs dialog for a view template showing rows such as Applied filters with different values under SOURCE and DESTINATION.
 - Click Close to return to the main window.
- If the dialog says it detects no field-level differences, the change may be in the template's graphic overrides, which Graft does not break down; the orange dot still warns you so you can overwrite if you need to.
4Select items in bulk
5 steps
Goal. Quickly tick what you want to graft without going checkbox by checkbox.
- To tick a whole category, click the tri-state checkbox on its header.The checkbox shows three states: all ticked, none or some. Clicking it ticks or unticks every visible item in that section.
- To tick everything new across all categories, click the New button on the top bar; to tick everything that differs, click Differs.Both buttons only act on visible items, that is, they respect any active search filters.
 assets/shots/graft/fig-06.pngQuick-selection bar with the Select all, Clear all, New and Differs buttons above the SOURCE column.
 - To tick or untick absolutely everything visible, use Select all or Clear all.
- For a specific group of rows: click a row to highlight it, Ctrl+click to add or remove rows from the highlight, or Shift+click to highlight a range; then tick the checkbox on any of the highlighted rows and they will all be ticked at once.The blue highlight is a visual pre-selection; the real selection is the checkbox. The Shift+click range works within a single category (the anchor and the final row must be in the same section).
- Combine the search box with selection: filter by a text (for example ARQ) and click Select all or the section checkbox to tick only the filtered items.
- The most common catch-up flow is: click New, review, and add by hand any differs you want to refresh.
- Items hidden by a search filter are never affected by bulk actions, so you never tick things without seeing them.
5Graft only what is missing (New only)
5 steps
Goal. Bring into the project the standards that do not exist, without touching anything you already have.
- Tick the items you want to bring across; the quickest way for this case is to click New on the quick-selection bar.
- Click the Graft N selected → button in the bottom-right corner.
- If any of the ticked items already exist in the destination, the Some items already exist dialog appears; click New only.New only keeps the existing items as they are and copies only what is missing. If there are no conflicts, this dialog does not appear and the transfer starts straight away.
 assets/shots/graft/fig-07.pngConflict dialog with the summary text and the Cancel, New only and Overwrite all buttons.
 - Wait for the status line to go from Grafting… to the summary, and review the Standards grafted dialog.The summary shows four cards: new (copied), overwritten, protected and skipped, plus detail notes.
 assets/shots/graft/fig-08.pngStandards grafted dialog with the new, overwritten, protected and skipped count cards.
 - Click Done to close the summary. Graft has already reloaded the statuses automatically, so the freshly copied items appear in grey (identical).
- The whole operation is a single transaction: if you change your mind, one Ctrl+Z in Revit reverts it entirely.
- Skipped items appear in the summary notes as Kept existing followed by the name.
6Overwrite standards that differ (Overwrite all)
4 steps
Goal. Update the project's standards with the versions from the source when they have fallen out of date.
- Tick the orange items you want to update; you can use the Differs button to tick them all in one go.Before overwriting, use the compare chip to confirm what changes in each one.
- Click Graft N selected → and, in the Some items already exist dialog, choose Overwrite all.Overwrite all replaces the existing items with the source version. The choice applies to every conflict in this operation; there is no element-by-element decision.
- Review the summary, paying attention to the protected card.Types with instances placed in the model are never overwritten (deleting them would destroy those instances); Graft leaves them intact, counts them as protected and explains it in the notes.
 assets/shots/graft/fig-09.pngStandards grafted dialog with the protected card in blue showing a value greater than zero and an explanatory note.
 - If you overwrote view templates, check the Re-applied template lines in the notes: Graft reassigns the new template to the views that used the old one.
- To update a protected type in place (one with placed instances), use Revit's native Transfer Project Standards, which does modify types in use; Graft prefers not to risk your instances.
- When overwriting, the item's sub-standards (materials, patterns, embedded profiles) reuse the ones in your project when the names match; if you also want their source versions, tick them and overwrite them explicitly.
7Graft view templates with their filters
4 steps
Goal. Bring across complete view templates without having to trace the filters they use by hand.
- Expand the View Templates section and tick the templates you want.
- There is no need to tick their filters: when you click Graft, the tool detects the filters each template applies and adds them to the transfer on its own.Dependent filters are copied before the templates, along with materials and patterns, so that each template finds its dependencies already in the destination.
- Click Graft N selected → and resolve the conflict dialog if it appears.If a dependent filter already exists in the destination with the same name, yours is reused; with Overwrite all the dependents are refreshed too.
- Review the summary: the filters brought along count in the cards just like every other item.
- If you also want the supporting graphic styles (materials, line or fill patterns), tick them too: Graft will copy them in the correct order automatically.
8Refresh the view after opening or closing models (Reload)
3 steps
Goal. Keep Graft up to date when the Revit session changes while the window is still open.
- If you open or close a project or a link while Graft is open, click Reload next to the Source drop-down.Reload rescans the available sources and reloads the standards from the selected source.
- If you switched the active document in Revit after loading standards, reload before grafting.Graft pins the destination at load time; if it detects that the active model is no longer the same, it rejects the transfer with a message saying the active model has changed and you must reload.
- After each graft you do not need to reload by hand: Graft rereads the statuses automatically so that the coloured dots reflect the new situation.
- Reloading clears the checkbox selection, so resolve any pending grafts first and reload afterwards.
Options reference 9 options
| Option | What it does |
|---|---|
| Source (source drop-down) | Choose the model to read standards from: other open projects (Open · name, with a local or cloud indication) or links loaded in the active model (Link · name). When you change it, the standards reload automatically. |
| Reload | Rescans the available sources and reloads the standards from the current source. Use it if you open or close models or links while Graft is open. |
| Select all / Clear all | Ticks or unticks every visible item across all categories in the source column, respecting any active search filters. |
| New / Differs (selection by status) | Ticks in one go every visible item that is new (New) or that differs from the current project (Differs). |
| Tri-state checkbox on each category | On the header of each source section: ticks or unticks the whole category (visible items only). Shows an intermediate state when the selection is partial. |
| Per-section search box (source and destination) | Each category has its own search field in both columns; it filters by name case-insensitively and is cleared with the cross. |
| compare chip / double-click | On orange items, opens the What differs dialog with the field-by-field differences between source and destination. |
| Conflict dialog (Cancel / New only / Overwrite all) | Appears on grafting if any ticked item already exists in the destination. Cancel aborts, New only keeps what exists and brings in only what is new, Overwrite all replaces the existing items (except types protected by having placed instances). |
| No persistent settings | Graft does not save any configuration between sessions: each time you open it, it starts from the real state of the models. |
What you get out
- Standards copied or overwritten in the active model, within a single Revit transaction named BIMIO Graft — transfer standards, reversible with a single Ctrl+Z.
- Automatic reassignment of view templates: views that used an overwritten template switch to the new version.
- Standards grafted summary dialog with four counts (new, overwritten, protected, skipped) and detailed notes on what was kept, protected or reassigned.
- Graft generates no files: all of its output lives inside the Revit model.