Overview
Christen is the BIMIO tool for bringing order to the family and type names in a Revit project. It scans the entire model, shows you the complete inventory in a Category → Family → Type tree and offers three routes for bulk renaming: export to Excel, edit there and import back; apply mechanical rules (prefixes, find and replace, numbering, case changes) directly from the window; or rename a specific element inline, without leaving the tree.
The heart of the tool is the Excel round-trip cycle: Christen generates a workbook with one row per type, you (or your team) edit the names and the identity parameters in the sheet, and on import Christen works out the difference, shows you a row-by-row preview and applies only what you approve, all in a single transaction you can undo with Ctrl+Z.
Each row of the workbook is anchored to its Revit element by its unique identifier (a hidden column), so you can reorder, filter or even delete rows and columns in Excel without breaking the correspondence. Christen also remembers which workbook belongs to which model: if you try to import the Excel file from another project, or if you have several models open and the panel no longer corresponds to the active model, it warns you before touching anything. That is its document identity guard.
Who it's for
BIM managers and architects responsible for naming standardisation in Revit projects: audit names against a convention, correct them in bulk and coordinate the changes with the team through a shared Excel workbook.
Requirements
- Revit 2022 to 2026 with the BIMIO suite installed (BIMIO tab visible on the ribbon).
- An open project: if there is no active document, Christen asks you to open one before starting.
- Microsoft Excel (or another application compatible with .xlsx) to edit the exported workbook; Christen does not need Excel installed to write the workbook.
- Write permissions in the export folder (by default, the FJV.FamilyRename.Exports folder on the Desktop).
- To apply renames, the model must not be open in read-only mode and must be the active model in Revit.
Where to find it
When you click the button, Christen scans the model with a progress dialog (which can be cancelled) and opens its main window, which is modeless: you can keep working in Revit with the panel open.
If you work with several models open, the panel stays bound to the model that was active when it opened. Write actions require that model to still be the active one; if it is not, a warning appears instead of touching the wrong model.
Key concepts 9 terms
- Round-trip
- The Export → edit in Excel → Import cycle. Christen writes the workbook, you edit the names in the sheet and the tool brings back only the differences, with a preview before applying.
- Linked workbook
- The project's canonical Excel file, named <model name>_MasterFamilyNaming.xlsx. Christen remembers its path per project: the Open Excel and Reveal buttons and the import use it without asking you, and the sync statuses are calculated against it.
- Sync status (pill)
- A coloured chip next to each type, family and category that summarises the relationship between Revit, the last export and the current Excel file: Up to date (green, everything matches), Excel pending (blue, there are edits in the workbook not yet imported), Revit changed (amber, the model changed after the last export), Conflict (red, changes on both sides), File missing (grey, the workbook is not where it was left) and Never exported (grey, never exported).
- Document identity guard
- A set of protections for sessions with several models: the panel memorises which document it belongs to, every operation resolves it by identity (not by whichever model happens to be active), the workbook records which model it came from, and if anything does not match, Christen warns you or stops rather than writing to the wrong model.
- System family
- Families that Revit does not allow to be renamed at family level (walls, floors, etc.). Christen marks them with the system tag and only lets you rename their types; in the Excel file, the family cell appears grey with an explanatory comment.
- In-place family
- Families modelled within the project itself. Christen marks them with the in-place tag in the tree and does allow you to rename them.
- Hidden __FJV_UniqueId column
- The first column of the workbook (hidden), holding the family|type key that anchors each row to its Revit element. It is the only essential column in the workbook: thanks to it, you can reorder or delete rows and columns without breaking the import.
- Naming convention
- A .NET regular expression you define in the panel's Convention bar. Types whose names do not comply are counted as off-standard, and you can filter and select them in one click to correct them.
- Rule preset
- A named chain of renaming rules saved per user (in your Windows profile) so you can reuse it in any project: for example, your practice's discipline prefix and standard numbering.
The interface
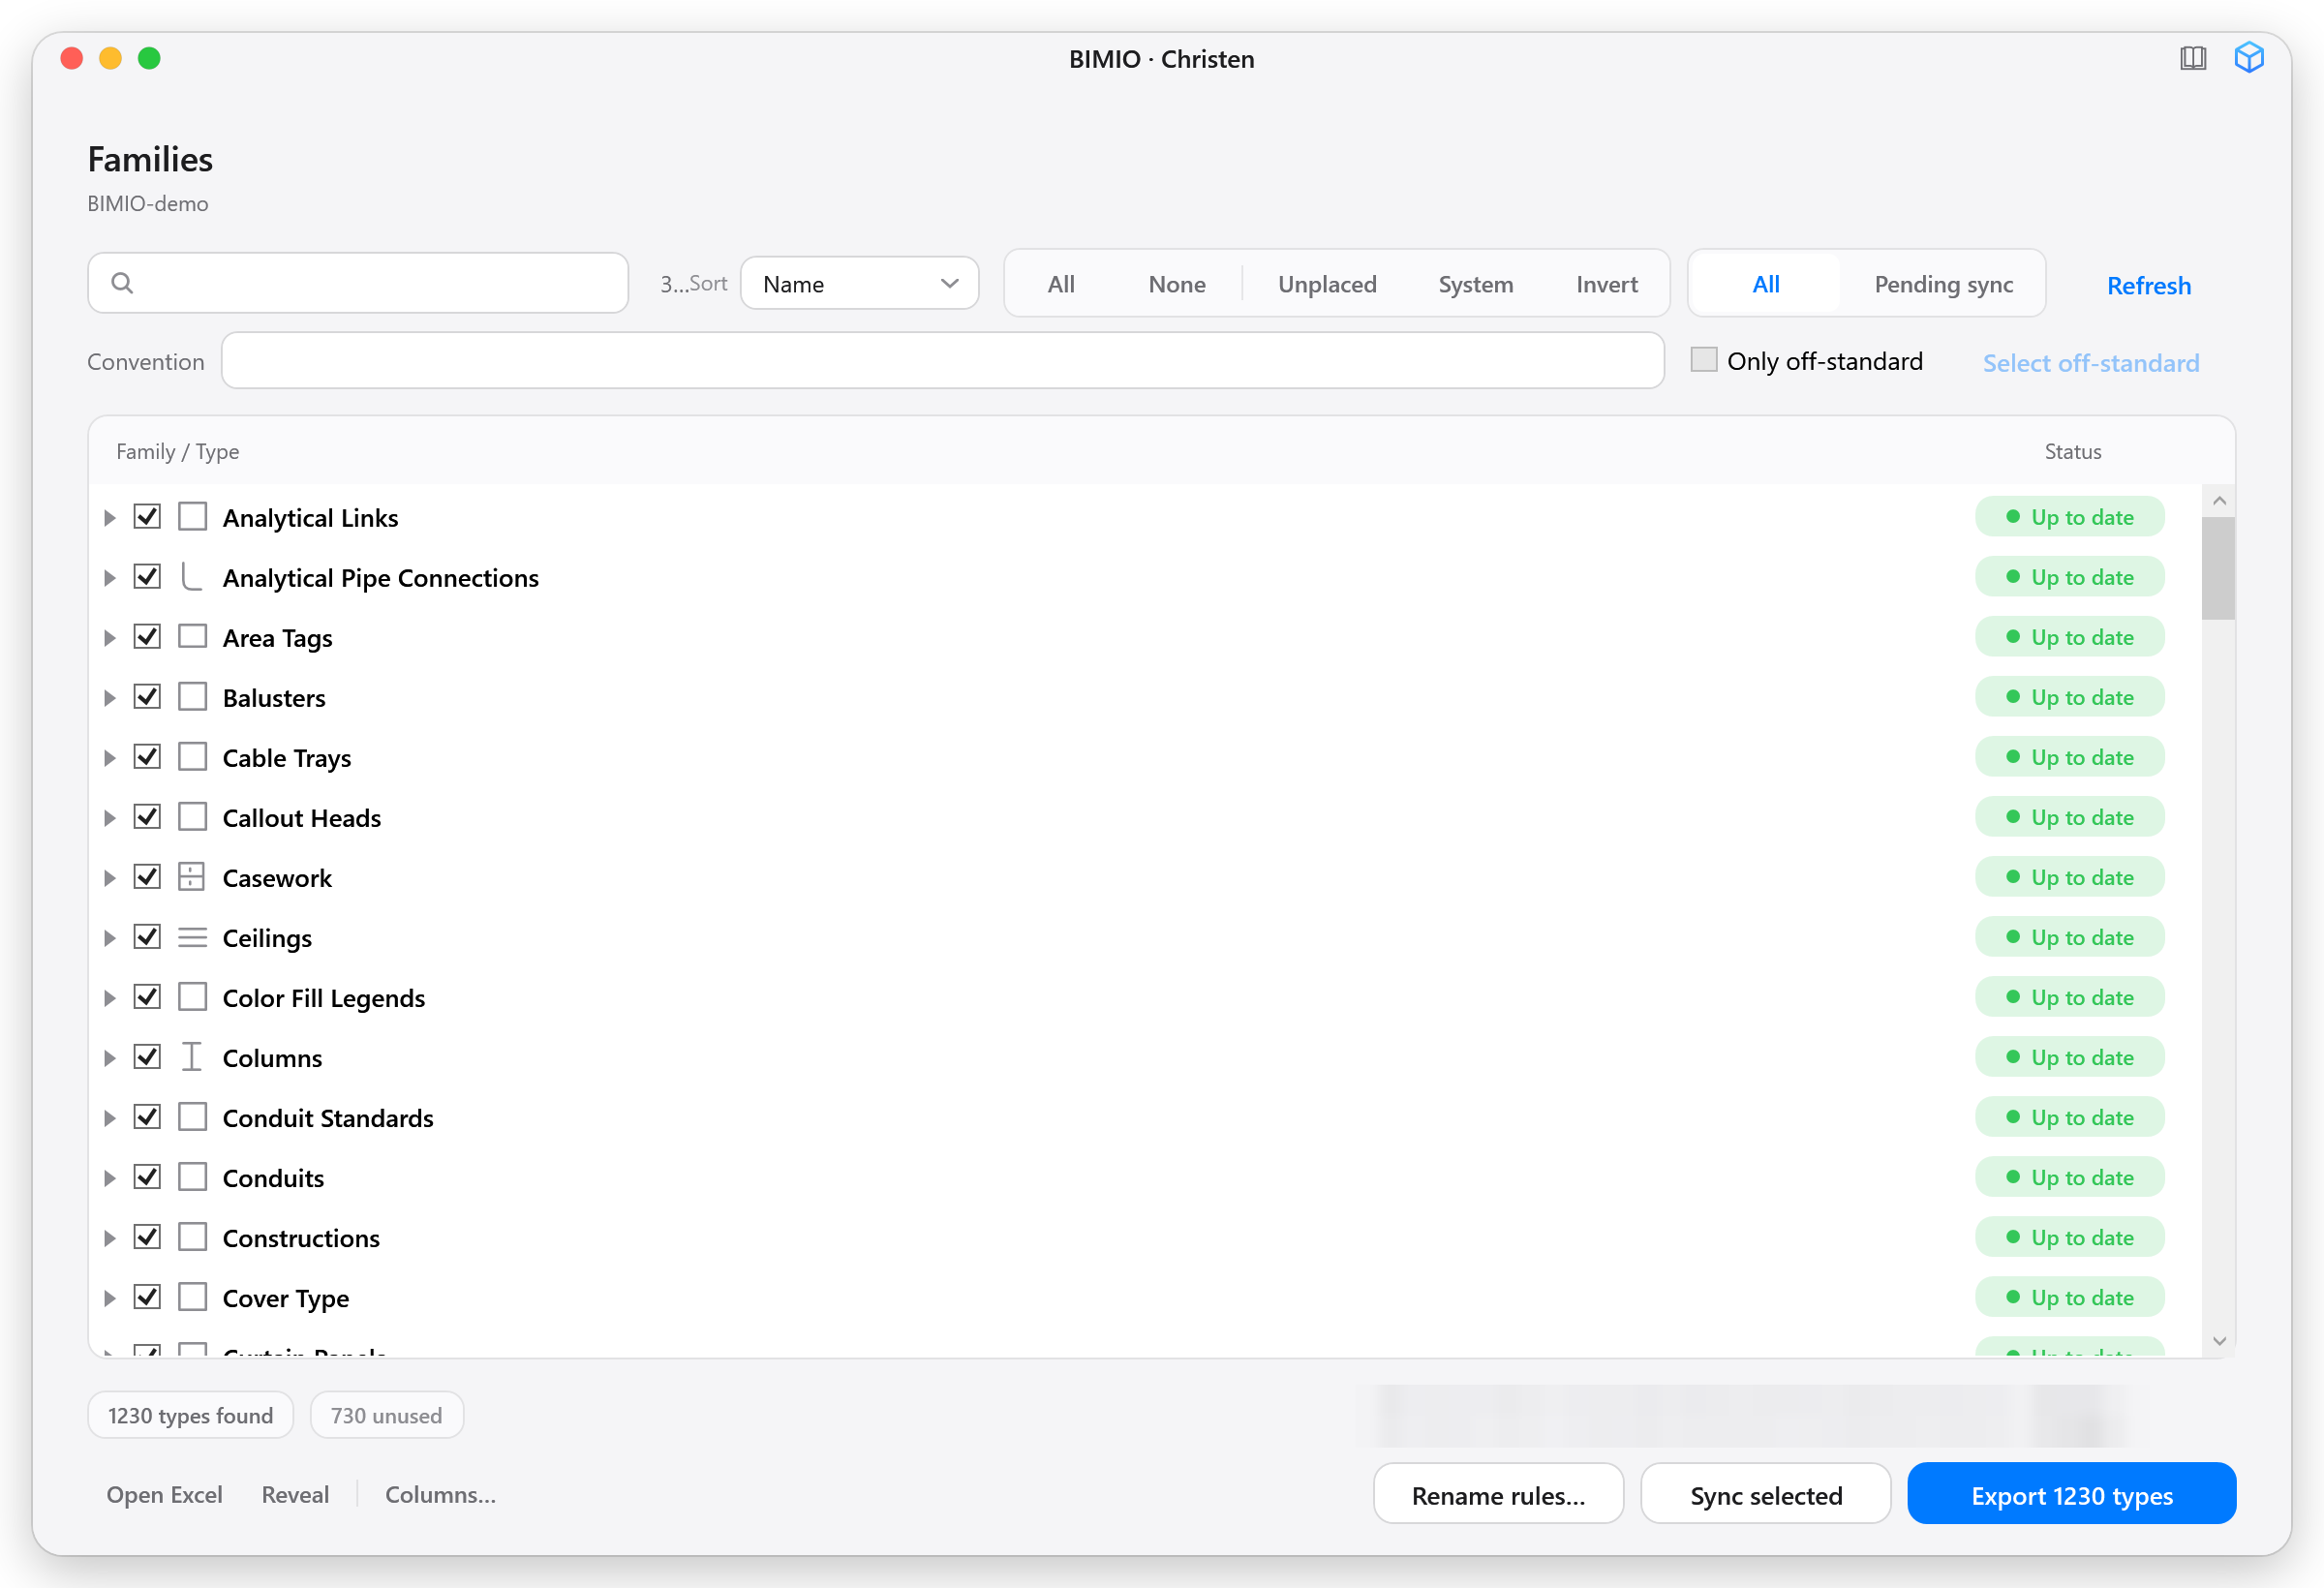
The main window (titled BIMIO · Christen) presents the model inventory as a three-level tree with checkboxes: categories, families and types. Each level has its sync status pill on the right, aligned under the Status header. Above the tree are the search box, the sort order, the quick-selection buttons, the All / Pending sync filter and the naming convention bar. Below, the footer gathers the counters, the export folder, the shortcuts to the linked workbook and the three action buttons: Rename rules…, Sync selected and Export.
The header shows the model name and, when it exists, a provenance line with the last import (who and when). In special situations, informational banners appear: model closed or not active, model open but detached from its central file, or linked workbook missing.
Step-by-step workflows 8 workflows
1Exploring and selecting the family inventory
6 steps
Goal. Understand which families and types exist in the model and tick exactly what you want to export or rename.
- Click the Christen button on the Data panel of the BIMIO tab.A progress dialog appears while Christen counts the placed instances and reads all the families and types. You can cancel the scan if the model is very large.
 assets/shots/christen/fig-03.pngScan progress dialog showing the Reading phase and the name of the family being processed.
 - Explore the tree: expand categories and families with the arrows and note the in-place and system tags next to families.All types arrive ticked by default. Each type's pill tooltip shows its sync status and how many placed instances it has.
- Type in the search box to filter by name (Ctrl+F moves focus to it).The search is case-insensitive and also shows the parents of each match, expanding them automatically.
- Choose the order in the Sort drop-down: Name (alphabetical), Most placed (most instances first) or Status (worst sync status first).
- Adjust the selection with the quick buttons: All ticks everything, None unticks everything, Unplaced ticks only types with no placed instances, System ticks only system family types and Invert inverts the current selection.The summary at the top shows how many families and types are selected and how many placed instances a rename would touch: it is your measure of the impact radius.
- If you are only interested in what has pending work, switch on the Pending sync toggle.It hides everything that is Up to date or Never exported and leaves visible only the types with an actionable status (Excel pending, Revit changed, Conflict, File missing).
- The placed instances summary warns you of the real scope before renaming: renaming a type with 500 instances breaks nothing, but it is worth knowing.
- The unused pill in the footer points out unplaced types, candidates for purging (that clean-up lives in the Misc tools, not here).
2Exporting families and types to Excel
5 steps
Goal. Generate the project's master naming workbook to edit it in Excel or distribute it to the team.
- Tick the types you want to export (or leave the full default selection).The main button changes its text to Export N types depending on how many you have ticked.
- Optional: click Columns… in the footer to choose which parameter columns the workbook includes.The Export columns dialog opens with the list of parameters available for your selection and All / None buttons to tick or untick them all. Category, Family and Type are always exported; any parameters you untick are excluded and the choice is remembered per project. Confirm with Use these.
 assets/shots/christen/fig-04.pngExport columns dialog with the list of parameters and several unticked.
 - Optional: click Change… next to the footer path to change the export folder.You can paste the path, type it or use Browse…. The folder is saved for this project: next time the panel will open pointing there.
- Click the Export N types button.Christen rescans the model just before writing (in case anything changed while the panel was open) and saves the file <model>_MasterFamilyNaming.xlsx in the chosen folder, overwriting the previous version. If the workbook had unimported edits, it asks you before overwriting them.
- In the Export complete dialog, choose Open file to open the workbook, Open folder to open its folder, or OK to close the notice.You can tick an option so it is not shown again during this Revit session. After exporting, all the exported types change to Up to date.
 assets/shots/christen/fig-05.pngExport complete dialog with the workbook path and the number of types exported.
- The file name deliberately carries no date: it is the project's canonical companion, not a history of snapshots.
- If Excel has the workbook open at that moment, Christen cannot overwrite it and will ask you to close it.
- Do not delete hidden column A (__FJV_UniqueId): it is what allows each row to be matched to its Revit element.
3Editing in Excel and importing the changes
7 steps
Goal. Apply to the model, with a preview and row-by-row control, the renames and parameter changes made in the workbook.
- Click Open Excel in the footer to open the linked workbook (or Reveal to locate it in File Explorer).
- Edit the Family and Type columns in Excel, along with any parameters you want (Description, Type Mark, Manufacturer…). Save and close the workbook.You can reorder, filter or delete rows and columns to work more comfortably: rows are matched by the hidden identifier, not by position. If the workbook is still open in Excel, the import will fail because of a file lock.
- Return to Revit. When the Christen window is reactivated, the pills update by themselves and the edited types appear as Excel pending (blue).The pill's tooltip shows the pending change in old name → new name format without needing to open the preview.
- Launch the import: click Sync selected with the types ticked, or click directly on an Excel pending pill.Christen uses the linked workbook without asking (it only opens a file picker if the workbook no longer exists at its path). If the workbook comes from another model, it warns you before continuing.
- Review the Review changes dialog: each row shows the kind of change (Kind badge), the category, the old and new names and the placed instances. Tick or untick rows to accept or discard changes; select a row to view and filter its parameter changes one by one.The top banner gives the summary: N changes, rejected by validation and orphan rows (types deleted from the model since the export). Validation errors (forbidden characters, renaming the family of a system family…) appear in a red panel and are not applied.
 assets/shots/christen/fig-06.pngReview changes dialog with several rows ticked, change-kind badges and the parameter changes panel expanded on one row.
 - Click Apply selected.Christen applies everything in a single transaction (types first, then families, then parameters). In workshared models, it skips — with a warning — any elements owned by another user. If Revit detects a serious error, it rolls back the entire transaction and tells you: it never leaves the model half-done.
- Read the summary in the Sync complete dialog and click OK.It shows how many renames and parameter writes were applied, failed or skipped, with access to the log if anything failed. Remember: everything was applied as a single step, so one Ctrl+Z in Revit undoes it completely.
 assets/shots/christen/fig-07.pngSync complete dialog with the count of applied changes.
- If you delete the Family or Type columns in Excel, nothing goes wrong: Christen restores them from the model, and those cells do not generate empty renames.
- A workbook that reads as empty (for example, an unsynchronised OneDrive placeholder) aborts the import without touching anything.
- You can hand the workbook to a third party (or to an AI with your naming standard), receive it back edited and import it just the same: the preview is always your final filter.
4Syncing in one click: Sync selected and the status pills
4 steps
Goal. Let Christen decide the correct direction (export or import) based on each type's status, from a single button or from a specific pill.
- Tick the types you want to bring up to date and click Sync selected.Christen inspects the statuses of the selection: if there are only Revit changed or Never exported, it pushes towards Excel (re-exports); if there are only Excel pending, it brings in the changes from the workbook (import with preview); if directions are mixed or there is any Conflict, it always opens the import preview so you can decide row by row; if everything is Up to date, it tells you so and does nothing. If the only actionable status in the selection is File missing, it replies that there is nothing to sync: re-export to recreate the workbook.
- To act on a single type, click its status pill.Excel pending or Conflict open the preview limited to that row; Revit changed re-exports the workbook (warning you if it would overwrite unimported edits); File missing shows the missing workbook notice. The Up to date and Never exported pills are disabled: no action is possible.
 assets/shots/christen/fig-08.pngDetail of a type row with the blue Excel pending pill and its tooltip showing the old → new change.
 - To act on a whole family or category, click the pill on that row.The group pill shows the worst status among its descendants and, when clicked, runs the sync on all the actionable types it contains, with the same direction logic and the same preview.
- If the Overwrite the workbook? notice appears when pushing towards Excel, decide: Overwrite rewrites the whole workbook from Revit (discarding the unimported edits), Cancel lets you import them first.
- The pills are recalculated automatically when you return to the window (Alt+Tab) and when types or families change in the model: there is no need to click Refresh to see them up to date.
- When in doubt, Christen always chooses the route with a preview: it never applies Excel changes without you seeing them first.
5Renaming by rules, without Excel
9 steps
Goal. Apply mechanical transformations (prefixes, find and replace, numbering, case changes…) to the selected types or families directly from Revit.
- Tick the types you want to rename and click Rename rules… in the footer.The button is disabled while no type is ticked.
- Choose the operation in the Operation drop-down: Find & replace, Add prefix, Add suffix, Change case, Sequential number, Trim spaces, Remove prefix, Remove suffix, Normalize separators or Remove accents.Each operation reveals its own fields: the text to find and its replacement (with Regular expression and Case sensitive checkboxes), the prefix/suffix text, the case mode (UPPERCASE, lowercase, Title Case), the separator delimiter, or the numbering pattern.
 assets/shots/christen/fig-09.pngRename rules dialog with the Sequential number operation configured and the old → new name preview.
 - Under Apply to, decide whether the rule acts on Type names or on Family names (loadable only).System families are excluded from family-level renaming because Revit does not allow it.
- To number, write the pattern with the tokens {name}, {n}, {category}, {family}, {familyIdx} and {typeIdx}, and adjust Start at, Step and Pad digits.The Numbering drop-down controls the counter's scope: Restart per family / category restarts the numbering in each family (or category), Continuous (global) uses a single counter for the whole selection.
- Optional: limit the rule's scope with the Only apply to names containing field (with its regex checkbox). Names that do not match pass through unchanged.
- Optional: click + Add step to chain several rules that are applied in order.Each confirmed step appears as a chip in the Chain (applied in order) area; you can remove it with the ✕. The preview always reflects the full chain plus the step you are editing.
- Review the Preview list: each line shows old name → new name, with blocked items in red (forbidden characters or duplicate names within the same family or category). The footer summary shows how many names will change and how many are blocked.Both an invalid regex in any step and any blocked name disable the Continue… button: adjust the rule (or exclude those types) until the summary reports no blocked names. That way a syntax error never ends in silent, half-done renames.
- Optional: save the chain as a preset with a name and the Save preset button; retrieve it later with Load or remove it with Delete.Presets are saved in your user profile and are available in all projects.
- Click Continue…: the same import preview (Review changes) opens with the proposed renames. Tick what you want to apply and click Apply selected.By reusing the same route as the Excel import, you get name validation, collision detection, per-row discarding and single-step undo for free.
- Chain steps for complex conventions: for example, Remove accents, then Normalize separators with a hyphen, then Sequential number with {family}-{n}.
- Trim spaces is the quick way to remove stray spaces that generate false changes in comparisons.
6Renaming an element inline and locating its instances
3 steps
Goal. Correct a single name without opening Excel or the rules dialog, and see in the model which instances a type uses before touching it.
- Double-click a type's name (or select it and press F2) and type the new name.Enter confirms, Escape cancels. You can also use the Rename option in the context menu. For families, F2 works only on loadable families: system families cannot be renamed at family level.
- Confirm with Enter.Christen validates the name (forbidden characters, duplicates within the same family) and applies it immediately in its own transaction, without a preview: you typed the name yourself. If it is invalid or collides, it warns you and does not touch the model.
- To see what uses a type before renaming it, open its context menu and choose Select instances in Revit or Zoom to instances.The first option selects all its placed instances in the model; the second also zooms to them. Both appear disabled if the type has no placed instances. Copy name copies the name to the clipboard.
 assets/shots/christen/fig-10.pngContext menu of a type with the Rename, Copy name, Select instances in Revit and Zoom to instances options.
- Inline renaming requires the panel's model to be the active one in Revit; if you are in another document, Christen will ask you to return to it.
7Monitoring and correcting the naming convention
5 steps
Goal. Detect the types that break the project's naming convention and correct them in bulk.
- In the Convention field, type the regular expression the names must satisfy, for example ^[A-Z]{2}-\d{3}.The pattern is saved with the project and restored when the panel reopens. Leave it blank to disable the check; an invalid pattern is ignored without flagging anything.
- Watch the amber N off-standard pill that appears next to the field: it counts the types whose names do not match the pattern.
 assets/shots/christen/fig-11.pngConvention bar with a regex pattern typed in and the amber pill showing 42 off-standard.
 - Tick the Only off-standard checkbox so the tree shows only the non-compliant items.
- Click Select off-standard to tick, in one click, all the types that break the convention.
- Correct them by whichever route you prefer: Rename rules… for mechanical transformations, Export to fix them in Excel, or inline renaming for one-off cases.
- The check feeds a renaming gesture, not a report: for broader quality audits, use the suite's inspection tools.
8Exporting the rename plan as evidence
4 steps
Goal. Save the old → new listing of a batch of changes to an Excel file, to archive it or share it before applying.
- Reach the Review changes preview by any route (Excel import or Sync).
- Adjust the row checkboxes to reflect exactly what you plan to apply.
- Click Export plan… in the bottom-left corner and choose where to save the file (by default FamilyRename_plan.xlsx).The plan captures the rows with their current selection state. Once saved, Christen tries to open it automatically.
- Continue with Apply selected or close with Cancel: exporting the plan does not apply anything by itself.
- Export the plan before applying large batches: if anything is questioned later, you have the exact snapshot of what was changed.
Options reference 19 options
| Option | What it does |
|---|---|
| Search box | Filters the tree by text across categories, families and types, case-insensitively. The parents of a match are shown and expanded automatically. Ctrl+F moves focus to it from anywhere in the window. |
| Sort | Tree order at all levels: Name (alphabetical), Most placed (most placed instances first) or Status (worst sync status first). |
| All / None / Unplaced / System / Invert | Quick-selection buttons: tick everything, untick everything, tick only types with no placed instances, tick only system family types, or invert the current selection. |
| All / Pending sync | Visibility toggle: All shows the whole tree; Pending sync hides what is up to date and leaves only the types with an actionable status. |
| Convention (regex pattern) | A .NET regular expression that type names must satisfy. It drives the off-standard counter, the Only off-standard checkbox and the Select off-standard button. Saved per project. |
| Refresh | Rescans the model completely and rebuilds the tree and the statuses (shortcut: F5). Needed to see types created in Revit while the panel is open (the automatic updates only repaint statuses). |
| Keyboard shortcuts | Ctrl+F focuses the search box; F5 is equivalent to Refresh; F2 renames the selected tree element inline (types and loadable families); while editing, Enter confirms and Escape cancels; double-clicking a type's name also starts editing. |
| Export folder (Change…) | The folder where the workbook is written. By default FJV.FamilyRename.Exports on the Desktop; once changed, it is remembered per project. |
| Columns… | Parameter column selector for the export. Category, Family and Type are always included; exclusions are saved per project and apply to the next export. |
| Open Excel / Reveal | Open the linked workbook in its default application, or show it selected in File Explorer. Disabled until a first export exists. |
| Do not show again (export dialog) | A checkbox in the export complete dialog that silences it for the rest of the Revit session. |
| Rename rules: Operation | The rule's operation: Find & replace, Add prefix, Add suffix, Change case, Sequential number, Trim spaces, Remove prefix, Remove suffix, Normalize separators, Remove accents. |
| Rename rules: Apply to | The rule's target: Type names or Family names (loadable only). System families are excluded from family-level renaming. |
| Rename rules: Regular expression / Case sensitive | In Find & replace, treat the search text as a regex (with $1, $2… for groups in the replacement) and respect upper and lower case. |
| Rename rules: numbering pattern and counters | Pattern with the tokens {name}, {n}, {category}, {family}, {familyIdx}, {typeIdx}; Start at, Step and Pad digits control the counter and its zero padding. |
| Rename rules: Numbering (scope) | Restart per family / category restarts the counter at each boundary; Continuous (global) uses a single counter for the whole selection. |
| Rename rules: Only apply to names containing | Scope condition for each step: the rule only acts on names containing the text (or matching the regex, with its checkbox). Left blank, it applies to everything. |
| Rename rules: presets | Save the rule chain under a name (Save preset), load it (Load) or remove it (Delete). Presets are stored in your user profile and work in any project. |
| Import preview: per-row and per-parameter selection | A checkbox per row to accept or discard each change, Select all / Select none, and individual checkboxes for each parameter change within the row detail (read-only parameters appear disabled). |
What you get out
- Excel workbook <model name>_MasterFamilyNaming.xlsx with the Families sheet (Category, Family, Type and identity parameter columns), a hidden identifier column and a hidden metadata sheet with the project identity.
- Type and family renames and parameter writes applied to the model in a single named transaction (undoable with one Ctrl+Z).
- Optional rename plan (FamilyRename_plan.xlsx) with the old → new listing from the preview.
- Activity record in the family-rename.log log file, accessible from the results dialog when anything fails.